CommerceFusion
Contents
CommerceFusion
CommerceFusion is efelle media's online store management system that allows eCommerce companies to build and sell unlimited products.
After logging into the CMS, access the module by clicking on Other Modules from the left hand navigation and then selecting eCommerceCM.
- You can also make the eCommerceCM module available as a Quick Link from the CMS dashboard by going into System Settings and selecting it from the Dashboard - Configure Quick Links section.
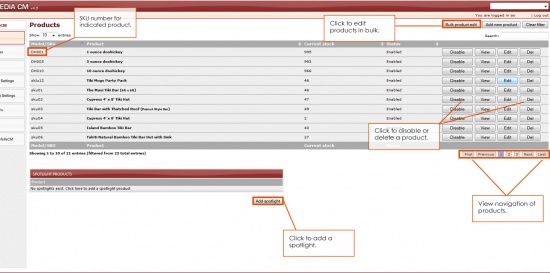
Clicking on eCommerceCM will bring you to the Products Overview Page. This page includes:
- Model/SKU
- Product - The Product Names in a listed format. Products in Bold are Parent Products, while products not in bold are Child Products.
- Current Stock
- Status - Enabled = visible and accessible on the front end of your website; Disabled = will not appear and cannot be accessed on the front end of your website.
- Disable, View, Edit, Del buttons - On the far right of each product.
- Pagination - To view other products listed by page number.
- Add New Product- Click to add a new product.
- Clear Filter
- Search - To search for product by Model/SKU or Product Name.
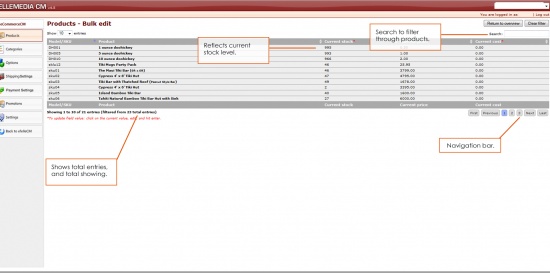
- Bulk Product Edit - View in bulk and update Current Stock, Current price and Current cost. The Bulk Product Edit view allows you to make these updates without having to open and edit EACH product individually.
Product Spotlights
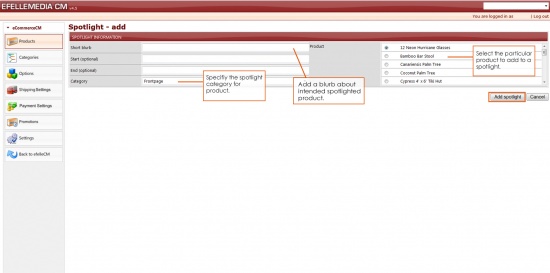
After selecting the Add Spotlight button on the Products Overview Page, the Add a Spotlight page will appear.
Click to Add a Spotlight Product:
- Short blurb - Add a blurb about the Product Spotlight or simply add the Product Name.
- Start (optional) - If applicable, insert a Start Date for the Product Spotlight to begin appearing. Otherwise, leave this field blank.
- End (optional) - If applicable, insert an End Date for the Product Spotlight to stop appearing. Otherwise, leave this field blank.
- Category - The Category indicates the location of the Product Spotlight. Depending on the website design, this may include the Homepage, Subpage, etc.
- Product - Select the product you would like to spotlight.< br>
Click the Add Spotlight button to save changes or select Cancel to direct back to the Product Overview Page.
Products
How to Add a Product
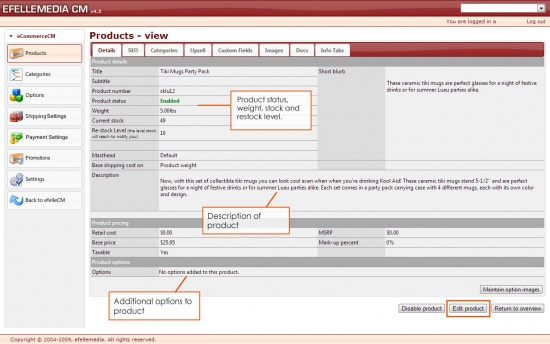
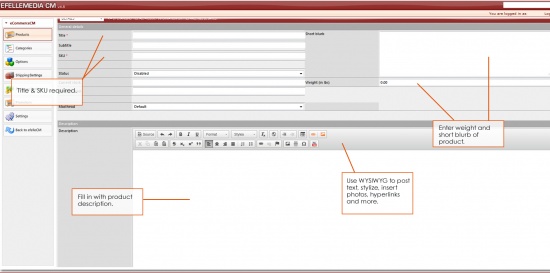
From the eCommerce overview, click on Add new product, on the upper right. This will open up the Product Details overview page where you will need to fill out the following fields:
Details
- Title- name of product of the product as it appears on the front end.
- Subtitle – if you have a subtitle for your product, often used for child products.
- SKU - or Stock Keeping Unit, refers to a unique identifier for each distinct product and/or service. This is necessary. Your product will not save unless you enter a SKU. If you do not use SKUs to track your product, you will need to make one up for the purpose of the CMS.
- Status – disabled (will not be visible from the front end) enabled (seen from the front end).
- Current stock
- Re-stock level
- Parent product - select from the drop-down menu
- Masthead – if this applies to you , we usually have this set up for you before going live. You can leave this alone.
- Short Blurb –
- Weight (in lbs) – if it applies. Helps to also calculate shipping charges if its determined by weight.
weight is either for display and/or shipping rules - carrier calculated or custom calculated rules.
Carrier Calculated shipping rules all that's required is a Original ZIP, Destination ZIP, and total weight of the cart
Custom Calculated shipping rules you can select weight as a parameter for falling into one of the price ranges
- Description – paragraph description of the product
- SEO keywords- The meta-keywords should be 10-15 keywords separated by commas.
- Meta description - the meta-description is a 160-character or less summary of that specific page with keywords.
Pricing
- Retail cost- Only if you want to track internally for reporting purposes, etc...
- Base price- Price of the product that will appear on the front end.
- MSRP - Manufacturer's Suggested Retail Price (if you want to track)
- Taxable - select Yes or No if your product is taxable or not.
Options
- you will have to set your Options Group first from OPTIONS from the left-hand navigation before you can add this to your product. Please see instructions below
From the left hand navigation of the eCommerce Module, click on the Options tab.
Click on Add option group
Group Name -
Display type - drop-down or Swatch/Image
Description - (need to populate otherwise you cannot add the group)
Click on Add group to Save
Once you have added the group, you can add items to the group
Click on add items
Add ALL the items to which that group option applies to. For example if the Group Option you have added is 'Size,' you will need to add all the sizes that are available for each of your product that it applies to. (e.g. o.5 fl. oz, 1 fl. oz, Men's - XL, Men's - L, Women's - Petite XS, etc...)
Once you are done adding the group options and the items for your group options, go back to the products' page and add the group option/s to the products.
Categories
Select the appropriate Categories for the Parent Product, as well as a Default Category. Although the Parent Product will appear in all of the Categories selected, the Default Category will appear on the Product Detail Page in the Breadcrumbs and in the URL.
Upsell
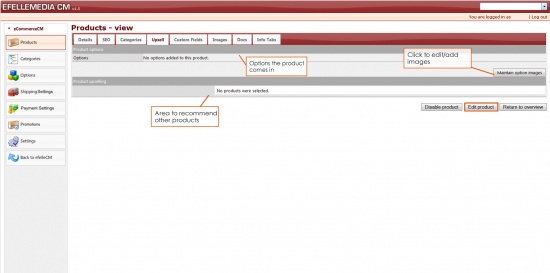
For the Parent Product, check the Products that you would like to appear in the "You may also like..." section of the Product Detail Page. If none are selected, this section will not appear. If there are more products checked than spots visibly available in the Upsell section then they will rotate at random each time that page is accessed.
Custom Fields
Custom Fields are dependent upon what the website design requires, but often entail additional information about the product and appear as pockets of information on the Product Detail page. If Custom Fields are utilized, be sure to fill in the available fields.
Info Tabs
Info Tabs typically appear below the Product Description.
To add a new tab, complete the following:
- Fill in the Tab Name. This will appear in the Tab section and be visible at all times. Be sure to pick a Name that represents the content within it.
- Set Tab Status as Public or Private. The Public Setting will display this tab on the front end of the website and be visible to users.
- Write Tab Contents, such as further information on the Product Description, Key Features, PDF/Product Manuals, etc.
To add an additional tab, click the + next to the top Tab Name, which is below the Production Section drop down.
Once all information has been added, select the Save Product button or proceed to a new Product Section in the drop down for your changes to save.
Media Images
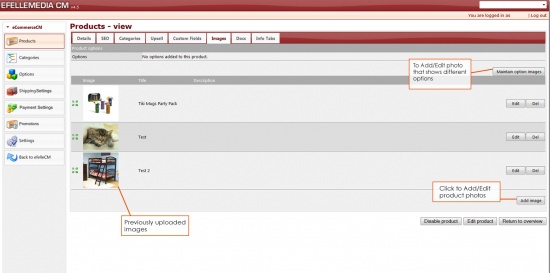
Parent Products should include all product images in the Media Images tab. The top image automatically appears as the default image. In order to change the default image, drag and drop the green leaflets of the intended default image to the top.
Child Products should have the applicable product images checked in the Media Images tab. The images checked will appear when the user selects that Child Product option.
Image Titles appear as captions when that Product Image is selected.
Media Documents
PDF's and Word Documents associated with a product are located here.
Categories
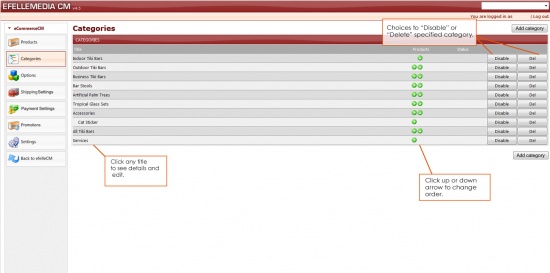
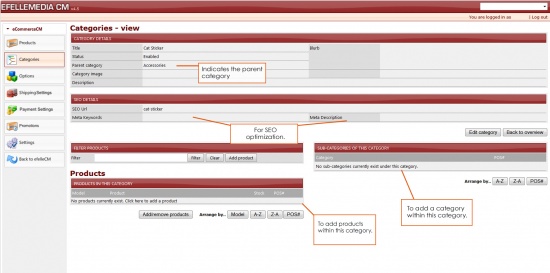
The Categories overview page lists all of the created categories. You can Disable/Enable Categories, Delete Categories, Sort Categories, Update Categories and Add Categories.
Sort Categories
Select the applicable green arrow to move the Category item up and down.
Updating Categories Click on the category title for the category you wish to modify. This will take you to the Category Details page where you can make changes to:
Category Details
To update Category Details, select Edit Category in order to make changes to the:
- Category Title
- Status (Enable or disable category from appearing on your website)
- Parent Category (Assign Category to make it a Sub-Category)
- Blurb
- Category Image (Appears on the Category Overview page of your website)
- Description
- SEO Details (Meta keywords and Description)
Products in this Category
Products in this Category display all products assigned to this category, which will then show on the Category Detail page of your website.
Filter Products
Filter products by typing the product name or model/sku you wish to find, then hit enter or click Filter.
To see all products again, select Clear next to the Filter field.
Sort Products Manually
In the POS# column, assign products the order in which you'd like them to appear within the category.
Save these changes by selecting the POS# button.
Arrange Products
Products in this Category can also be arranged automatically by:
- Model (Alphabetizes by model/sku number)
- A-Z (Alphabetizes by product name)
- Z-A (Reverse alphabetizes by product name)
Add/Remove Products
To add or remove Products in this Category, select the Add/remove products button and check or uncheck the applicable products.
Once finished, select Back to Category Overview.
Products can also be assigned to Categories in the Category tab of the Product Detail Page.
Sub-Categories of this Category
Sub-categories of this Category will appear if the current category has been selected as the Parent Category in another Category Detail Page. These sub-categories are sometimes referred to as Child Categories and appear on the Category Overview Page of your website.
Sort Sub-Categories Manually
In the POS# column, assign sub-categories the order in which you'd like them to appear within the category.
Save these changes by selecting the POS# button.
Arrange Sub-Categories
Sub-Categories of this Category can also be arranged automatically by:
- A-Z (Alphabetizes by product name)
- Z-A (Reverse alphabetizes by product name)
Updating a Sub-Category
To Edit a specific sub-category, select the Edit button, which will then direct you to that Category's Detail Page.
To Delete a specific sub-category from the CMS system, select the Del button and a second page will appear, asking if you wish to continue.
Select the Delete Category button to confirm deleting this Sub-Category or click Back to Category Overview to undo this action.
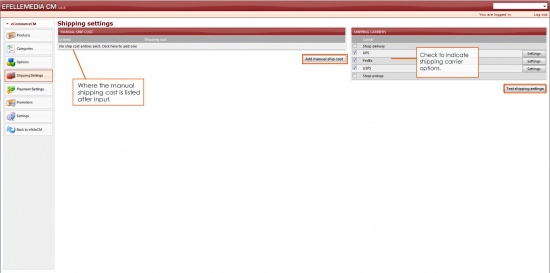
Shipping Settings
The Shipping Settings page is used for updating shipping details. During the project production process, our developers will initially set up the Shipping Settings based on the information provided to the designated project manager.
However, future adjustments can be made to:
Manual Ship Cost
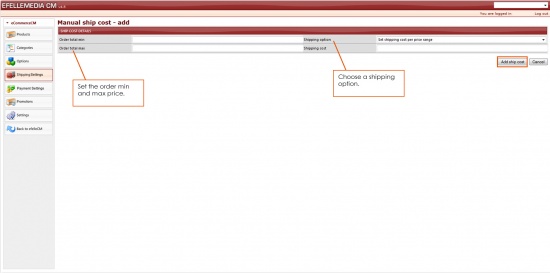
To add a ship cost entry, select the Add Manual Ship Cost button.
In the Manual Ship Cost details page, select the appropriate Shipping Option. This includes:
- Set shipping cost per ship destination
- This allows you to update Ship to State and Country fields in order to specify how much shipping to the selected location will cost.
- Use shipping carrier estimate
- Automatically calculates shipping costs based on the selected carrier's estimate.
- Set shipping cost per price range
- Set a set shipping cost for a specific purchase range.
- Free Shipping
- Removes all shipping costs from each purchase.
Based on the item selected, the available field information will change and additional details may be required to complete the Manual Ship Cost creation process.
Once all Manual Ship Cost details are complete, select the Add Ship Cost button to save and apply the added information.
Shipping Carriers
The checked Shipping Carriers are available for users to select in the order process.
- To enable or disable this option, simply check or uncheck the applicable shipping carrier.
- To view the Shipping Details of a specific carrier, select the Settings button.
Test Shipping Settings
After the shipping carrier settings are complete, you can test these rates by selecting the Test Shipping Settings button.
- Enter Test Environment - Set Up field information
- Provide a Destination Shipping Address
- Check various products from the list below
- Update the Product Quantities in Your Demo Cart
- Click on the Run Test button to calculate Shipping Rates
- Select a Shipping Method from the drop down to add to the Grand Total
To run another test, select the Clear Demo Cart in the top right corner.
Once all testing is complete, click on the Return to Overview button.
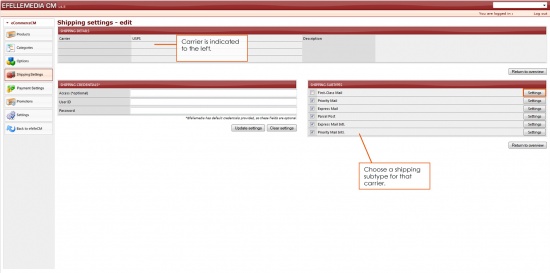
Shipping Details
After selecting the Settings button for a Shipping Carrier in the Shipping Settings page, the applicable Shipping Details page appears.
- Note that the Shipping Carrier selected is indicated in the top left.
Shipping Credentials
Shipping Credentials are also available, but efelle media provides default credentials, so these fields are optional.
Shipping Subtypes
The checked Shipping Subtypes are available for users to select in the order process.
- To enable or disable each option, simply check or uncheck the applicable shipping subtype.
- To view the Sub-Shipping Settings of a specific carrier, select the Settings button.
Sub-Shipping Rules
Sub-Shipping Rules are how you specify various rates, locations and other details associated with a Shipping Subtype. This shipping rule then applies to qualified customer orders during the purchasing process.
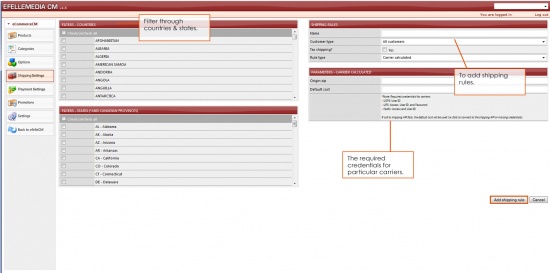
Add Shipping Rule
- To add a shipping rule, select the Add Shipping Rule button below the Sub-Shipping Rules list.
- Check all of the Countries and States this rule will apply to.
- Give the Shipping Rule a descriptive name.
- Choose the Customer Type to specify which customers this rule applies to.
- Check or uncheck whether to tax shipping.
- Select a Rule Type from the drop down to determine how the rule will be applied.
The available Rule Types include:
- Carrier Calculated
- Enter the zip code where the products are originating from and a default shipping cost in case the Shipping API fails to connect.
- Flat Rate (or Free Shipping)
- Select the Rate Type, which is either a Percentage Amount of the cart total or a Dollar Amount. For Free Shipping, set a dollar amount of $0.00
- Custom Calculated
- Specify if shipping will be based on Weight, Items in Cart or Cart Total. Next fill in the range fields by a Dollar Amount or a Percentage of Cart Total.
- Not applicable
- Select this Rule Type if shipping is not applicable for the provided filter settings.
Once all Shipping Rule information is complete, select the Update Shipping Rule to save.
Payment Settings
Acceptable Credit Card Types
Check boxes to indicate acceptable credit card types. These options will become available to be selected by users during the Product Check Out process.
Promotions
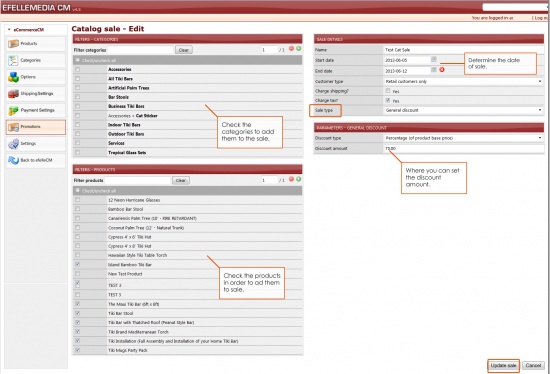
Catalog Sales
Shopping Cart Sales
Products of the Day
Settings
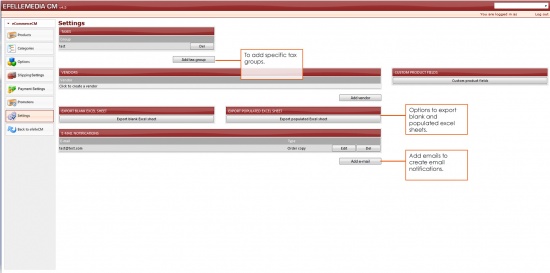
The Settings page in the CommerceFusion module allows you to:
- Update, add or delete Taxes
- Add, delete or sort Custom Product Fields
- Export a Populated Excel Sheet
- Update, add or delete Email Notifications
Taxes
Taxes are automated in the checkout process using standard government rates. Adding a tax group in the Taxes detail page overrides these rates on a per state basis.
Custom Product Fields
If the project design required a Custom Group, you can add, delete or sort Custom Fields within the created group. After selecting the Custom Product Fields button, click on the applicable Group Name to access the Group Details Page.
Add Custom Fields
Select the Add Item(s) button and fill in the additional Custom Fields. Once finished, select the Add Item(s) button or click cancel to undo.
Sort Custom Fields
Select the applicable green arrow to move the Custom Field item up and down.
Delete Custom Fields
To Delete a Custom Field, select the Del button and a second page will appear, asking if you wish to continue.
Select the Remove Item button to confirm deleting this Custom Field or click Cancel to undo this action.
The Custom Fields information can be completed in each Product Detail Page, under the Custom Fields tab.
Export Populated Excel Sheet
Clicking the Export Populated Excel Sheet button will open an excel sheet with product information. Exporting this data can take a few minutes, depending on the total number of products listed.
The populated spreadsheet includes the following tabs:
- Base Info
- Images
- Categories
- Options
- Custom Fields
- Additional Info
- Upselling
Email Notifications
Adding an email to Email Notifications sends specific updates to that address. These notification types include:
- Order Copy (When an order is completed, the additional email addresses entered will also be notified)
- Stock Level Notification (When the stock for a product reaches the specified Restock Level)
- RMA Notification (When a customer wishes to exchange or return a product)
Add Email Notifications
- Select the Add Email button
- Enter email address into the Email field
- Select applicable Notification Type from drop down menu
- Click Add Email Notification button to Save or click Cancel to undo changes
Update Email Notifications
To Edit a specific Email Notification, select the Edit button, which will then direct you to that Email Notification Detail Page.
To Delete a specific Email Notification, select the Del button and a second page will appear, asking if you wish to continue.
Select the Remove Email Notification button to confirm deleting this Email Notification or click Cancel to undo this action.
|
All content copyright © 2005-2012 efellemedia. All rights reserved. |
