ECatalog Module
Contents
eCatalog Module
The eCatalog Module is efelle media’s online catalog management system that allows companies to build and display unlimited products.
After logging into the CMS, access the module by clicking on Other Modules from the left hand navigation and then selecting eCatalog.
- You can also make the eCatalog module available as a Quick Link from the CMS dashboard by going into System Settings and selecting it from the Dashboard – Configure Quick Links section.
eCatalog Dashboard
Clicking on eCatalog module will bring you to the eCatalog dashboard/overview page. This page includes:
- Traffic Information
- Popular Categories
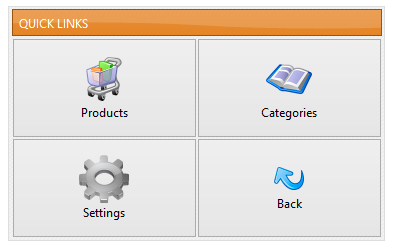
- Popular Products and QuickLinks
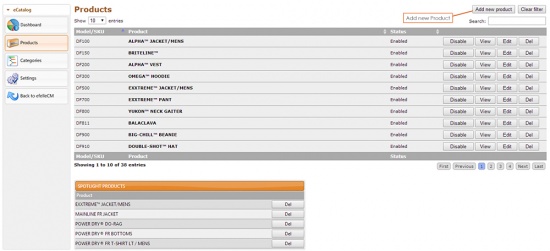
Clicking on Products from the left hand navigation or from QuickLinks on the eCatalog dashboard will bring you to the Products Overview Page. This Page includes:
- Model/SKU
- Product - The Product Names in a listed format.
- Status –
Enabled = visible and accessible on the front end of your website;
Disabled = will not appear and cannot be accessed on the front end of your website
- Disable, View, Edit, Del buttons - On the far right of each product.
- Pagination - To view other products listed by page number.
- Add New Product- Click to add a new product.
- Clear Filter
- Search - To search for product by Model/SKU or Product Name.
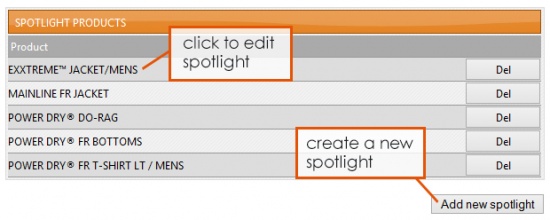
Product Spotlights
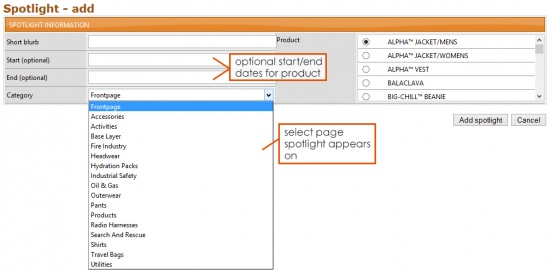
After selecting the Add Spotlight button on the eCatalog Products Overview Page, the Add a Spotlight page will appear.
To Add a Spotlight Product:
- Short blurb - Add a blurb about the Product Spotlight or simply add the Product
- Start (optional) - If applicable, insert a Start Date for the Product Spotlight to begin appearing. Otherwise, leave this field blank.
- End (optional) - If applicable, insert an End Date for the Product Spotlight to stop appearing. Otherwise, leave this field blank.
- Category - The Category indicates the location of the Product Spotlight. Depending on the website design, this may include the Homepage, Subpage, etc.
- Product - Select the product you would like to spotlight.< br>
Click the Add Spotlight button to save changes or select Cancel to direct back to the Product Overview Page
Products
How to Add a Product
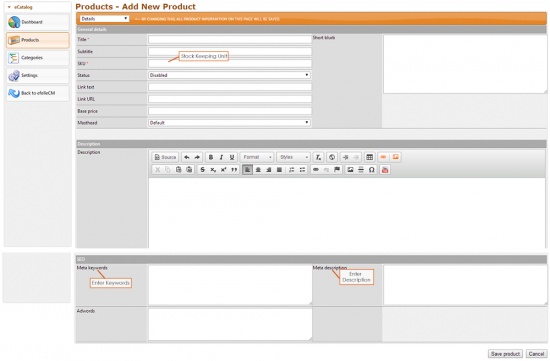
From the eCatalog Products Overview, click on Add new product, on the upper right. This will open up the Product Details overview page where you will need to fill out the following
fields:
Details
- Title- name of product of the product as it appears on the front end.
- Subtitle – if you have a subtitle for your product
- SKU - or Stock Keeping Unit, refers to a unique identifier for each distinct product and/or service. This is necessary. Your product will not save unless you enter a SKU. If you
do not use SKUs to track your product, you will need to make one up for the purpose of the CMS.
- Status – disabled (will not be visible from the front end) enabled (seen from the front end).
- Masthead – if this applies to you , we usually have this set up for you before going live. You can leave this alone.
- Short Blurb –
- Description – paragraph description of the product
- SEO keywords- The meta-keywords should be 10-15 keywords separated by commas.
- Meta description - the meta-description is a 160-character or less summary of that specific page with keywords.
After Details, go to the drop down menu on the upper left and select from the ff:
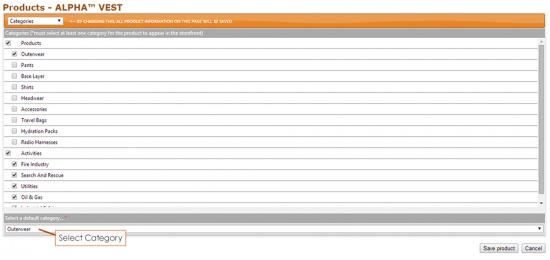
Categories
Select the appropriate Categorie/s for the Product, as well as a Default Category. You will not be able to save your product entry until you have selected a default category.
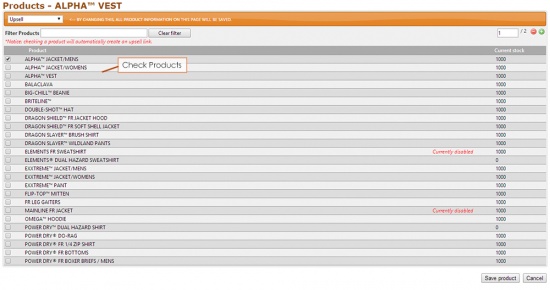
Upsell
Check the Products that you would like to appear in the "You may also like..." section of the Product Detail Page. If none are selected, this section will not appear. If there are more products checked than spots visibly available in the Upsell section then they will rotate at random each time that page is accessed.
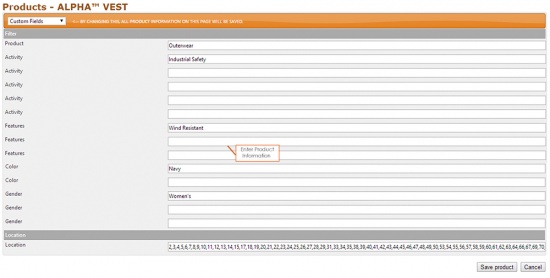
Custom Fields
Custom Fields are dependent upon what the website design requires, but often entail additional information about the product and appear as pockets of information on the Product Detail page. If Custom Fields are utilized, be sure to fill in the available fields.
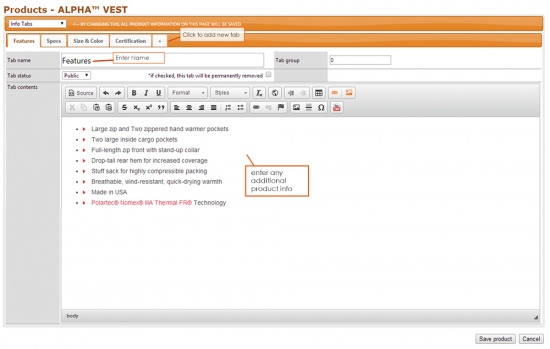
Info Tabs
Info Tabs typically appear below the Product Description.
To add a new tab, complete the following:
- Fill in the Tab Name. This will appear in the Tab section and be visible at all times. Be sure to pick a Name that represents the content within it.
- Set Tab Status as Public or Private. The Public Setting will display this tab on the front end of the website and be visible to users.
- Write Tab Contents, such as further information on the Product Description, Key Features, PDF/Product Manuals, etc.
To add an additional tab, click the + next to the top Tab Name, which is located right below the Products drop down menu on the upper left.
Once all information has been added, select the Save Product button or proceed to the next selection in the drop down for your changes to save.
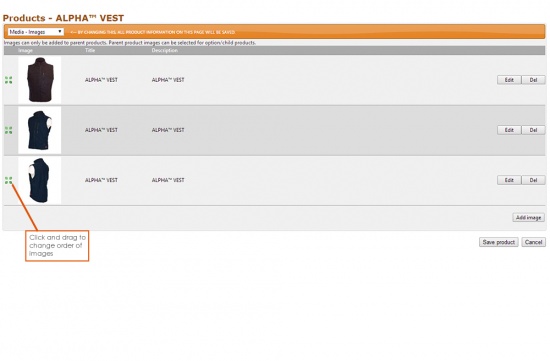
Media Images
Images for the product are uploaded here. The top image automatically appears as the default image. In order to change the default image, drag and drop the green leaflets of the intended default image to the top.
Media Documents
PDF's and Word Documents associated with a product are located here.
Categories
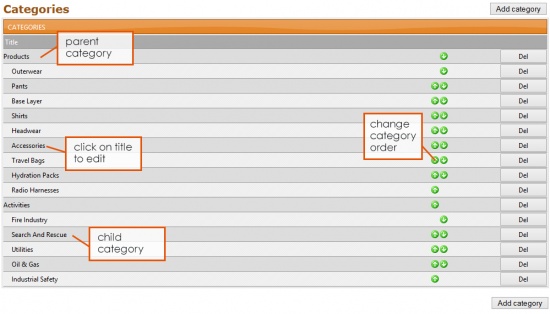
The Categories overview page lists all of the created categories. .
Sort Categories
Select the applicable green arrow to move the Category item up and down.
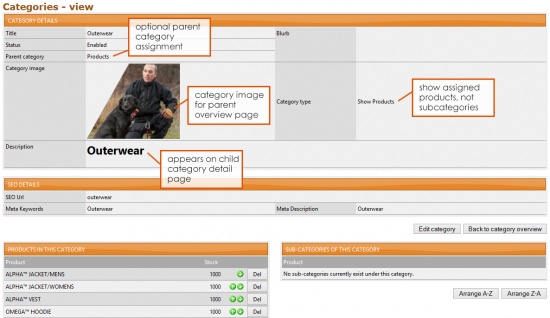
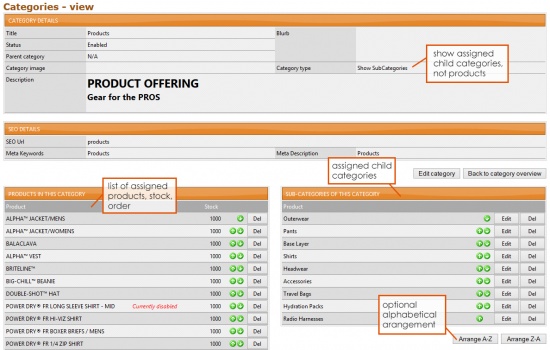
Updating Categories Click on the category title for the category you wish to modify. This will take you to the Category Details page where you can make changes to:
Category Details
To update Category Details, select Edit Category in order to make changes to the:
- Category Title
- Status (Enable or disable category from appearing on your website)
- Parent Category (Assign Category to make it a sub-category if it applies)
- Blurb
- Category Image (Appears on the Category Overview page of your website)
- Description
- SEO Details (Meta keywords and Description)
Products in this Category
Products in this Category display all products assigned to this category, which will then show on the Category Detail page of your website.
Arrange Products
Products in this Category can also be arranged automatically by:
- A-Z (Alphabetizes by product name)
- Z-A (Reverse alphabetizes by product name)
Add/Remove Products
To add or remove Products in this Category, select the Add/remove products button and check or uncheck the applicable products.Once finished, select Back to Category Overview.
Sub-Categories of this Category
Sub-categories of this Category will appear if the current category has been selected as the Parent Category in another Category Detail Page. These sub-categories are sometimes referred to as Child Categories and appear on the Category Overview Page of your website.
Arrange Sub-Categories
Sub-Categories of this Category can also be arranged automatically by:
- A-Z (Alphabetizes by product name)
- Z-A (Reverse alphabetizes by product name)
Updating a Sub-Category
To Edit a specific sub-category, select the Edit button, which will then direct you to that Category's Detail Page.
To Delete a specific sub-category from the CMS system, select the Del button and a second page will appear, asking if you wish to continue. Select the Delete Category button to confirm deleting this Sub-Category or click Back to Category Overview to undo this action.
