Image Optimization
Contents
What is image optimization?
Before using an image on the web, it has to be properly optimized. When images are not optimized, they are much larger in file size (and often dimension) that what they should be, and will increase web page load times. There are 3 types of images that are generally used on the web, and each has a very specific purpose. It’s very important to use the right file type for your images, to ensure you get the best possible file size, so your site loads as quickly and efficiently as possible. The file types are:
- JPG/JPEG : this file type is probably the most common. This format is used for photographic (or bitmap) images. Most of the images you would normally include in your pages to illustrate the subject matter, are typically of this format. Any photo that looks like it was taken with a camera (vs something that was created primarily with a computer) is typically best suited for the JPG format. One thing to note is that the JPG format does not support transparency, so any image requiring transparency can not be a JPG file.
- PNG : used in almost all cases in modern websites for images that require transparency. The “GIF” format (described below) also supports transparency, but the big difference is that PNG files support what’s called “alpha blending” – that that means is that a pixel in the image is not just “on” or “off”, it can be partially visible (e.g. semi see-through). This makes edges in transparent images look natural and clean. PNG files are most suited for images that are primarily vector graphics – that means things such as logos, text, buttons, etc. Since those tend to have more solid colors vs the photographic/bitmap images that work better for the JPG format. In some instances PNG is used instead of JPG when you need to isolate (for example) a person’s profile picture to be on a transparent background. Please note that while that is perfectly acceptable use, it will result in images with a larger average file size (and a slower load time) than non-transparent JPG images. Also note, that for proper alpha blended transparency, the “24 bit” variety of the PNG format needs to be used (there is also an older “8 bit” version that does not use alpha (or semi-transparency) information, and will result in jagged edges)
- GIF : this format is basically identical to the 8-bit version of the PNG format previously described. It allows for transparency, but since it does not support semi-transparency, it will have jagged edges around any transparent areas. It is best suited for vector-type images (text, largely solid blocks of color, logos, buttons, etc). Unless the GIF format is absolutely required, the PNG format is typically recommended.
Once the images are saved in the proper format, they need to be optimized for quicker load times. Optimizing images is the process of selectively removing certain portions of image data from the file, in a way that leave the images looking (very nearly) as good as the original, while reducing the overall file size. The average image file has far more data than what the human eye can really distinguish, which means we can reduce the quality by a sizeable amount, while still keeping enough picture quality to keep the file looking good.
Fortunately, optimizing images is very simple with the use of a free tool that can be downloaded and installed on your computer.
Optimizing using Shrink O’Matic
The tool of choice for quickly and easily optimizing images in large batches at once is Shrink O’Matic. You can download this tool for free by going to the following URL:
On this page you will find an "Install" link. Clicking on this will trigger the install process. You might need to have the Adobe Air plugin installed, though the process will detect whether or not it’s already installed, and if not, will provide you with the option to install that first.
Once the application is installed, you will have an item in the start menu that you can find by clicking the “Start” (or Windows) button on the bottom left corner of your task bar, going to “All programs”, and locating the “Shrink O’Matic” item.
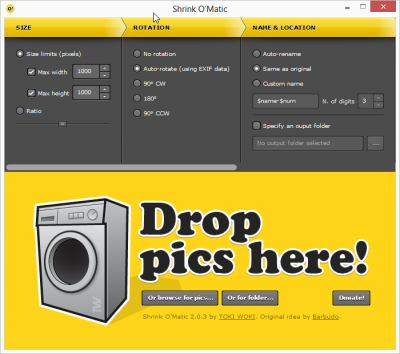
Click on the link to open the application. This should open the interface, which will look like this by default:
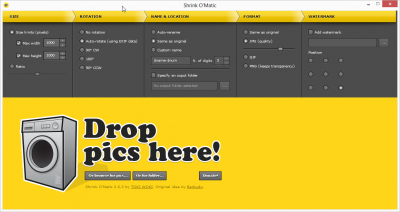
Before using the application, extend the window to the right to see all the options, like this:
| Please note |
|---|
| different image types have different optimization processes. You won’t get much of a decrease in file size optimizing GIF and PNG files, unless you are decreasing the overall dimensions. We recommend using this tool primarily to optimize images to the JPG file type, as this is where the biggest improvements can be made to file size. |
There are a number of options to set before doing the actual optimization.
First of all, you want to set the options in the “SIZE” block. We recommend setting the “Size limits (pixel)” option, and checking both the “Max width” and “Max height”, and setting both of them to 1000 pixels. Images shown on screen are typically never larger than 1000 pixels in any one dimension, and saving them at a higher resolution will only result in files with an overly large file size. On the “ROTATION” block, you can leave the default to “Auto-rotate”. This will use data inside the image to determine if it was taken in a portrait or landscape orientation, and update the orientation on the file accordingly as it’s being saved.
For “NAME & LOCATION” there are a few options. Normally we recommend you create a new, separate folder to store your optimized images in. That way you don’t lose your originals in case you ever need to get back to them in their original format. You would create the new folder in My Computer, then in Shrink O’Matic, you check the box “Specify an output folder”, and click the button with the 3 dots on it to browse to, and select, your newly created folder. This way you have all your optimized files in one spot. Normally setting the “Same as original” option for the file name works best, creating the optimized images using the same file name.
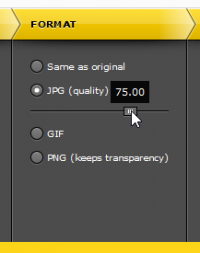
On “FORMAT”, you select which format you want the optimized images to be saved as. As mentioned previously, you would almost always use “JPG (quality)” here. If you are optimizing GIF or PNG files for overall pixel dimensions, we recommend setting the output to “PNG (keeps transparency)”. For anything else, you would set this to “JPG (quality)”. This also enables the slider right below this option. It does not show a number, however if you click on the slider, you see a number appears, indicating the quality percentage you are retaining. Set this to 75%:
On the “WATERMARK” section, you typically don’t have to set anything, unless you want to put a watermark on your images. If that’s the case, you can check the “Add watermark” checkbox, select the file to use, and click the “Position” for the spot where on each file you want the watermark to be included. Now that you are ready to go, you open the images in Shrink O’Matic. You can do this one of 3 ways:
- Open the folder containing your images in My Computer, select all the images (or even the full folder) to be optimized, and drag it over to the Shrink O’Matic window, and drop it in the section that says “Drop pics here”. This will start the process and you will see the progress in that same area as the program works through the files to optimize.
- Click the “Or browse for pics…” button. This opens a browsing dialog to select one or more individual files. Click the “Open” or “OK” button to open them, which will load them into Shrink O’Matic, and will start the process of optimizing them.
- Click the “Or for folder…” button to open the folder selection dialog. This lets you select full folders to optimize all images within this folder.
Now you can zip up the files into a zip archive (if you do not have a program installed that can compress files into a zip file, please see the next section) and post the files on the efellemedia project tracker (BaseCamp)
Compressing the files into a single ZIP archive
If you don’t have any tools installed to create a zip file, you can download the free 7-Zip tool by going to 7-zip.org and downloading the version for your operating system. If you’re not sure if you should get the 32-bit or 64-bit version, you can always get the 32-bit version, as this will work on both 32-bit and 64-bit operating systems.
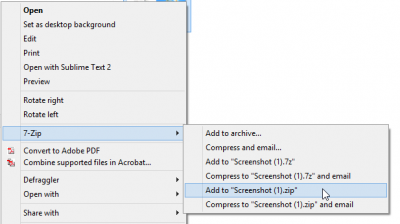
Open the downloaded file to install the tool. All default settings are fine. Once the program is installed, you go to the folder in My Computer containing all the optimized files. Select all files and right-click on any one of them. This will open the context menu. You should have a 7-Zip item in this menu. Hover your mouse over it to open the sub-menu inside of it. In the sub menu you should have an option that looks something like this
The name between the quotes is based on the folder name you are currently in. Select the “Add to ‘xxxx.zip’” option. This will create a single archive in that same folder. Upload the newly created file to the project tracker.
GIF or PNG?
GIF and PNG files have similar properties and in some cases can be used interchangeably. There are however some big differences that make each type more suitable for other purposes. The GIF format is older and has the limitation of supporting only 256 different colors in a single image. They can be any 256 colors (most photo editing programs will automatically select the 256 most suitable colors for the image in question), but never more than 256 different colors in a single file. For this reason GIF files are not optimal for photographic-style images, because the average photo uses hundreds of thousands of separate colors. Also, while GIF files support transparency, it does not support semi-transparency (or 'alpha blending'). A pixel in the image is either 100% transparent, or 100% solid color. Due to this, it's near impossible to make a transparent GIF image look good on both dark and light backgrounds. It is however an excellent format for images that are vector based (e.g. large areas of solid color) or images that have text in them (e.g. logos with a company name in them). PNG files support all the things the GIF format supports, and adds some improvements (in large part this stems from the fact that the PNG format was created to be a patent-free alternative to the GIF format). It supports any number of colors as well as true alpha blending. This allows you to create images where the edges are properly feathered / faded. This way you can easily create images that are easy to use on both dark and light backgrounds and will not display jagged edges on either (unlike the GIF format). Because this format has the addition of an alpha channel for each picture (the alpha channel indicates the percentage of how 'see through' a pixel is, allowing for partial transparency) and it supports any number of colors, there is a possibility that the same image stored in both GIF and PNG formats ends up being slightly larger in the PNG format. This added filesize typically does allow for a better looking graphic.


