ManagePro (v3)
Contents
ManagePro (v3)
The ManagePro platform allows property management companies to efficiently manage available properties and customer inquiries.
Properties
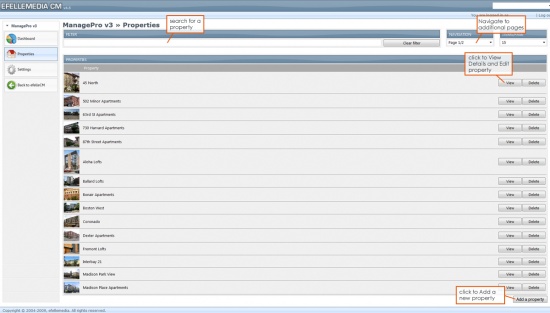
The Properties overview page alphabetically lists all of the created properties. You can Search for Properties, Edit Properties, Delete Properties and Add New Properties.
Search for Properties
In the search bar, begin typing the property you wish to find. The properties will automatically filter while you type.
To See All Properties again, select Clear Filter.
Page Navigation is also available to the right of the search bar. Either increase the number of items displaying per page or specify which page you’d like to navigate to.
Updating a Property
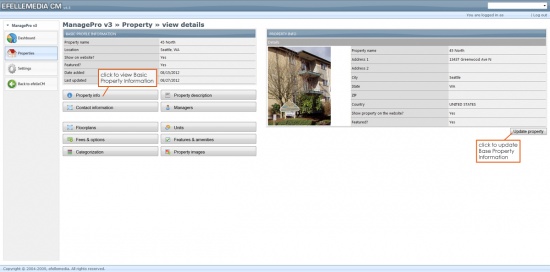
Locate the property you wish to modify and select View. This will take you to the Property Details page where you can make changes to:
- Property Details
- Contact Information
- Managers
- Floorplans
- Property Fees and Options
- Property Features and Amenities
- Categorization
- Property Images
Adding a Property
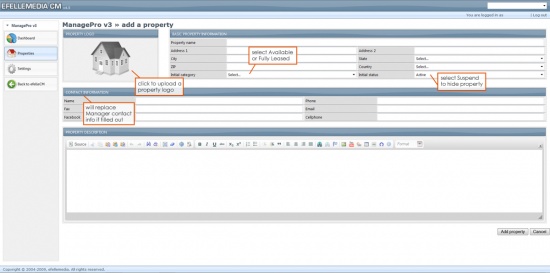
At the bottom of the Property Overview page, select Add a Property.
Basic Property Information
- Fill out the Property Name and location.
- Select Available or Fully Leased from the Initial Category drop down menu.
- Initial Status allows you to toggle between displaying and hiding the new property online.
- Either keep the Initial Status Active to display or select Suspend to hide the property.
Contact Information
Filling out this Contact Information will override any Manager Contact Information.
Leave this section blank if you wish to assign a Manager to this Property.
- You can select the Property Manager after filling out the Property Description and selecting Add Property.
Property Description
Fill out the Property Description with information on the property.
- It’s helpful to share details like the location, building age, recent renovations or appealing community features.
Once desired fields have been filled out, select Add Property.
Property Details
To update Basic Property Information, select Property Info and click Update Property.
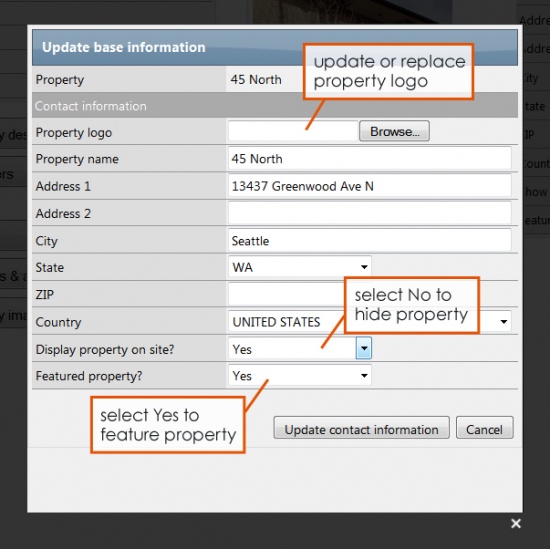
Under the Update Base Information pop-up, you can:
- Upload a new Property Logo
- Modify the Property Name and location
- Select Yes and No to Display or Hide this property online
- Select Yes and No to Feature this property
Once finished, select Update contact information.
Contact Information
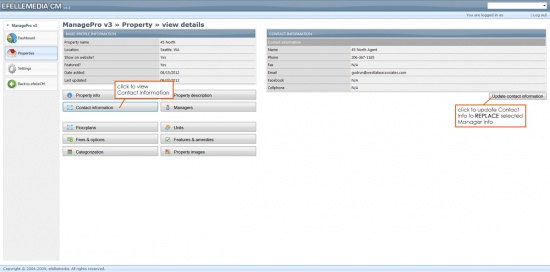
To update Contact Information, select Contact Information and click Update Contact Information.Updating this Contact Information will REPLACE the Property Manager Information.
Under the Contact Information pop-up, you can:
- Modify the Manager Name
- Update Phone, Fax, Email, Facebook and Cellphone information
Only fill out the information you want potential customers to have access to.
Once finished, select Update contact information.
Managers
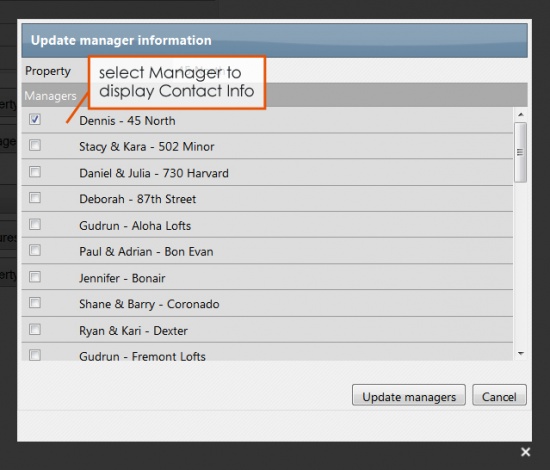
- To update or assign the Property Manager, select Managers and click Update Manager Information.
- Under the Update Manager Information pop-up, check the Manager you want to assign to this property.
- If the correct Property Manager isn’t available then you will need to add a New Manager OR fill out the appropriate Contact Information in the Contact Information section.
Once finished, select Update Managers.
Floorplans
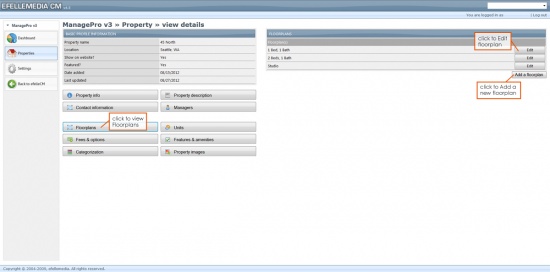
- To add a Floorplan, select Floorplans and click Add a Floorplan.
- Fill out the Floorplan name that indicates how many bedrooms and bathrooms it has. For example, 2 Bed, 1 Bath or Studio.
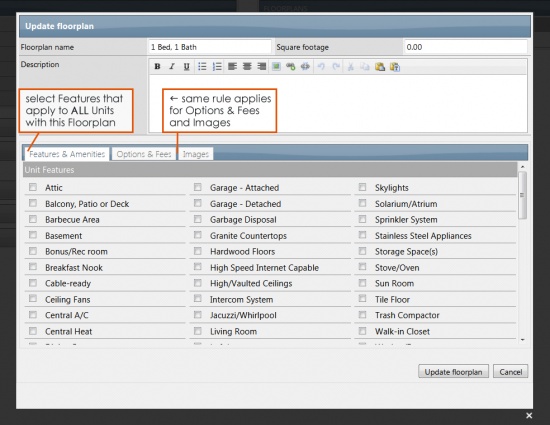
- Floorplan information, such as the square footage, Features and Amenities, Options and Fees, and Images,
- will be replaced by any Unit Information that is filled out and assigned to that floorplan.
- Add Features and Amenities, Options and Fees and Images that apply to all Units with this particular floorplan.
Once finished, select Update floorplan.
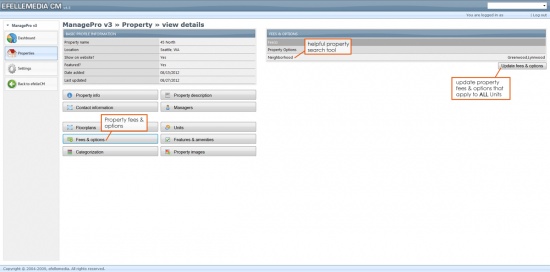
Property Fees and Options
- To update Property Fees and Options, select Fees and Options and click Update Fees and Options.
- Any information added in Unit Fees and Options will REPLACE the Property Fees and Options information added here.
- Add Property Options, Unit Options and Fees that apply to ALL Units. For example, adding the Neighborhoods that this property is located in is a helpful property search tool.
- If you do not have any Neighborhoods to select then you need to add Neighborhoods in Settings.
Once finished, select Update contact information.
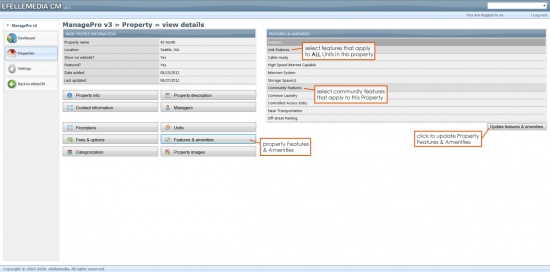
Property Features and Amenities
To update Property Features and Amenities, select Features and Amenities and click Update Features and Amenities.
- Under Unit Features, select features that apply to ALL Units in this property.
- Under Community Features, select community features that apply to this property.
Once finished, select Update contact information.
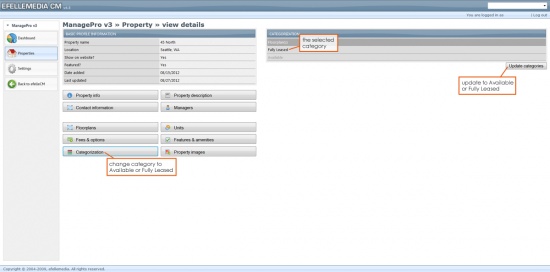
Categorization
To change the Property Category to Available or Fully Leased, select Categorization and click Update Categories.
Check either Fully Leased or Available.
- Selecting Fully Leased will automatically hide all of the Units within this property. However, the property itself will still display online.
- Hiding this property entirely can be found in Property Information.
Once finished, select Update Categories.
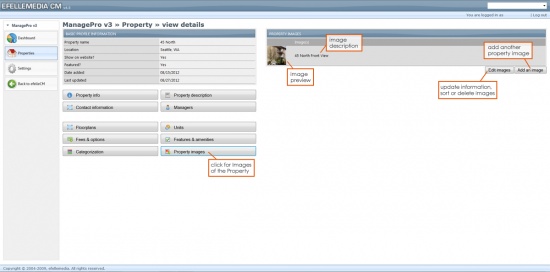
Property Images
To add or edit property images that are additional to the Property logo, select Property images and click either Edit Images or Add an Image.
Adding a Property Image
- After selecting Add an Image, click Browse and find the property image you wish to upload.
- Select Open and provide the image with a title and brief description.
- Once finished, select Upload new image.
Editing a Property Image
After selecting Edit images, you can:
- Sort Property Images by dragging and dropping the green arrows
- Change the Property Image title
- Check delete to permanently remove the Property Image.
Once finished, select Update Image(s).
Units
Units specific to this Property are listed in the Units section of the Property Details page.
Adding or Updating a Unit
Locate the Unit you wish to update and select Edit or click the Add a Unit button below.
After completing Basic Unit Information, Unit Features and Amenities, Unit Options and Fees, Unit Images, select Update Unit.
Basic Unit Information
- Insert the Unit Name. Including the Unit Number with the name helps Users differentiate between the other available units.
- Select the Unit’s Floorplan. If there are no floorplans to choose from then you need to create a Floorplan.
- The Display drop down menu allows you to Hide or Show the Unit. If the Unit is leased, you may want to select Hide. Once it becomes available, you can easily select Show and it will appear online.
- Provide a Description specific to this Unit. For example, if it has a great view or is more spacious than other Units on this property. You can also create a generic description and use it for every Unit instead.
Unit Features and Amenities
In the Features and Amenities tab, select all Features that are Specific to this Unit.- The Property’s Features and Amenities will still display on the Property page, but the Features and Amenities selected here will show as Rental Features in the Unit Detail Page.
- Although the Features and Amenities are categorized by Unit Features and Community Features, they will show listed together as Rental Features for that Unit.
Once all changes have been made, select Update Unit.
Unit Options and Fees
In the Unit Options and Fees tab, there are fields for Property Options, Unit Options and Fees, which provide further details on the Unit.
Property Options
- Fill in the Office Hours the Property Manager is available. If there is not set Office Hour schedule, put By Appointment or a suggested Contact method.
- Click into the Neighborhood text field and select the neighborhood(s) the Unit is located in.
- If you do not have any Neighborhoods to select then you need to add Neighborhoods in Settings.
- Provide brief information on Parking for this Unit. If there is no Parking available, perhaps indicate No Parking Provided or Street Parking Only.
Unit Options
- Insert the Square Feet of the Unit
- Record the appropriate time frame the Lease is available for in Lease Terms
- Select the number of Bathrooms and Bedrooms this Unit has available. Options for Bedrooms also include Studio and Loft.
- Insert the Date this Unit is available and the monthly Rent payment.
*A green dollar sign indicates that this text field will only take numbers.
Fees
- Insert the appropriate Deposit and Pet Deposit amount required for this Unit. If the Property or Unit does not allow pets, say No Pets Allowed in this text field.
- Fill out the appropriate amount if the Unit has a Non-Refundable Fee or a Utility Fee. An explanation for each fee is also an option, such as indicating it is a cleaning fee or on a per month basis.
*A green dollar sign indicates that this text field will only take numbers.
Once all changes have been made, select Update Unit.
Unit Images
The Images tab holds images specific to the Unit and what it looks like.
To add new images:
- Click on the Select Files button.
- Once you’ve located the appropriate Unit image, select the image and click Open. *If you wish to upload multiple images at once, select the first image and hold down Ctrl for each additional image. Once all images have been selected, click Open.
- The selected images will display as a list in the right side box.
- Select Upload Files and each image will begin to show on the left.
- Once all images have been uploaded, give each a name or short description of what part of the Unit the image is showing.
Sort the images by dragging and dropping the green arrows to the left of each image.
If you wish to delete an image, select the Delete check box.
Once all changes have been made, select Update Unit.
Settings
The Settings page in the ManagePro module allows you to:- Update, sort, add or delete Features and Amenities
- Update, sort, add or delete Fees and Options
- Update, add or delete Managers
Features and Amenities
Categorized by Feature Groups and Features
Adding a new Feature or Feature Group
At the bottom of the Features and Amenities page, select either Add a Feature or Add a Feature Group.
If Adding a Feature Group:
- Fill in the Group Name
- Add a brief description of what this group will consist of
Once all Group Detail fields are complete, click Add Feature.
If Adding a Feature:
- Fill in the Feature Name
- Select the appropriate Feature Group
- Provide a brief description of what this Feature is
Once all Group Detail fields are complete, click Add Feature.
Updating a Feature or Feature Group
- Find the Feature or Feature Group you wish to update.
- Select Edit in order to change the name, description or Feature Group.
- Fill in the Group Detail fields with the updated information and click Update Feature when finished.
Search for Features and Amenities
In the search bar, begin typing the Feature you wish to find. The Features will automatically filter while you type.
To see all Features again, click Clear Filter to the right of the search bar.
Sort Features and Amenities
- Locate the Feature Group that the Features you would like to re-order are located in. Click Sort Features on the Feature Group line.
- The following page will display the list of Features within that Feature Group. Drag and drop the green arrows in order to sort of the Features.
- Once you’ve finished sorting the Features, click Update Order at the bottom. Select Cancel if you do not wish to save these changes.
You can also sort Feature Groups by selecting Sort Feature Group at the bottom of the Features and Amenities page.
Deleting a Feature or Feature Group
Find the Feature or Feature Group you wish to delete and select the Delete button.
Upon Deleting a Feature, a second page will appear, asking if you wish to continue.
Select the Remove option button or select cancel if you wish to undo this action.
Upon Deleting an Feature Group, a second page will appear, asking if you wish to continue.
- If you would like to save the items in this group, select a different Feature Group from the drop down menu. This will then transfer the items to that particular group.
- If you do not select a different Feature group, these items will be permanently removed.
Select the Remove option button or select cancel if you wish to undo this action.
Fees and Options
Categorized by Option Groups and Options
Adding a new Option or Option Group
At the bottom of the Fees and Options page, select either Add an Option or Add an Option Group.
If Adding an Option Group:
- Fill in the Group Name
- Add a brief description of what this group will consist of
Once all Group Detail fields are complete, click Add Option Group.
If Adding an Option:
- Fill in the Option Name
- Select the appropriate Option Group
- Select the best text field type in the Option Type
- Select No under Use for Filtering
Once all Group Detail fields are complete, click Add Option.
Updating Fees and Options
- Find the Option or Option Group you wish to update.
- Select Edit in order to change the name, Option Group or Option Type.
- Fill in the Group Detail fields with the updated information and click Update Option when finished.
Search for Fees and Options
In the search bar, begin typing the Option you wish to find. The Option will automatically filter while you type.
To see all Options again, click Clear Filter to the right of the search bar.
Sort Fees and Options
- Locate the Option Group that the Options you would like to re-order are located in. Click Sort Options on the Option Group line.
- The following page will display the list of Options within that Option Group. Drag and drop the green arrows in order to sort of the Options.
- Once you’ve finished sorting the Options, click Update Order at the bottom. Select Cancel if you do not wish to save these changes.
You can also sort Option Groups by selecting Sort Option Group at the bottom of the Fees and Options page.
Deleting an Option or Option Group
Find the Option or Option Group you wish to delete and select the Delete button.
Upon Deleting an Option, a second page will appear, asking if you wish to continue. Select the Remove option button or select cancel if you wish to undo this action.
Upon Deleting an Option Group, a second page will appear, asking if you wish to continue.
- If you would like to save the items in this group, select a different Option Group from the drop down menu. This will then transfer the items to that particular group.
- If you do not select a different Option group, these items will be permanently removed.
Select the Remove option button or select cancel if you wish to undo this action.
Neighborhoods
Neighborhoods are found in the Fees and Options page, under Property Options.
- To add, remove or update neighbors, click the Edit button.
- In Option Values, type in applicable neighborhoods and make sure each neighborhood is comma separated.
- Select Update Option to save changes.
Managers
Managers listed from oldest to newest
Adding a new Manager
At the bottom of the Managers page, select Add a Manager.
To add a new Manager:
- Select Add a Manager at the bottom of the Managers overview page.
- In the First Name text field, add Manager name(s).
- In the Last name text field, you can add either the manager’s last name or the property name. Inserting the property name makes it easier to select the appropriate manager for each Property or Unit.
- In the second Manager Details area, fill out the desired contact information. Only fill out the information you want potential customers to have access to.
Once Manager Details are complete, click the Update Category button.
Updating Managers
- Find the Manager you wish to update and select View.
- Fill in the Manager Detail fields with the updated information and click Update Category when finished.
Search for a Manager
In the search bar, begin typing the Manager or Property Name you wish to find. The Managers will automatically filter while you type.
To see all Managers again, click Clear Filter to the right of the search bar.
Deleting Managers
- Find the Manager wish to delete and select the Delete button.
- The Remove a Manager page will appear and verify that you would like to remove the selected Manager.
- Select the Remove manager button or select cancel if you wish to undo this action.
|
All content copyright © 2005-2012 efellemedia. All rights reserved. |
