Scheduling(v3)
Scheduling(v3) is efelle media's third edition of the scheduling module that handles creating events and ties in with the CRM for registrations. Events can be categories for front-end filtering. The Scheduling module is based on Apple's iCal, so it works in similar ways, such as, creating recurring events, editing individual date metadata, and exporting the calendar in the form of an .ical file.
Dashboard
The scheduler v3 dashboard displays after selecting the scheduler v3 module. Here you'll find recent traffic information, recent registration, quick links (add new event, find a registration/event, calendar view, & settings), a smaller calendar, and a list of events on the calendar.
Calendar
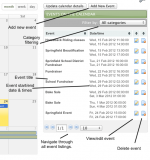
The calendar gives a full overview of all events. Initially, the calendar will start on today's current date and show all dates from all categories.
By changing the calendar month (right and left arrows at the top left of the calendar), the Event Listing interface will update with the events on the current month being viewed. The Event Listing interface will give a more detailed overview of the calendar events. You can click to view/edit or delete events from this interface.
Changing the calendar view (month, week, day), will not change the events listed on the Event Listing interface, but will only give you a different view of the calendar.
Update Calendar Details
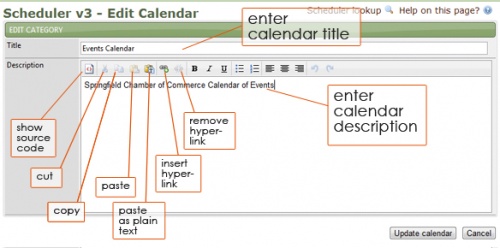
Update the calendar title and description. Click on the 'update calendar details' button (found within the 'calendar' section of the schedule v3 module in the upper right hand corner).

Enter the name of the calendar in the title field. Enter a brief description in the description field using the wysiwyg editor provided. Click 'update calendar' (in the bottom right) to save changes.
Adding An Event
From the Scheduler v3 - Calendar page, click on a date within the calendar or click the add new event button in the upper right hand corner. (Can also be accomplished from the dashboard using the quick link or clicking on a date within the quick calendar.)
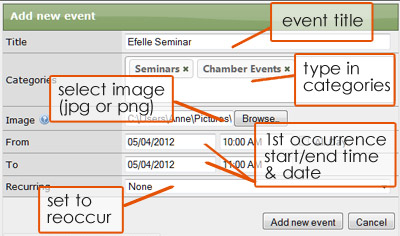
An Add New Event dialog box will display. Enter the following:- Title - title of the event that appears for all date records.
- Categories - select multiple categories this event falls under (for filtering purposes). Begin typing to reveal similarly titled categories, if the desired category is not already created, finish typing & click enter.
- Image - image associated with event, displays on front-end in featured events list on the calendar overview, as well as on the events detail page.
- From - 1st occurrence start date & time
- To - 1st occurrence end date & time
- Reoccurring - None, Daily, Weekly, Monthly, or Yearly
When complete click Add New Event to add the event. See editing an event to add additional details & view registrations.
Single day events vs recurring events
Events are classified as either Single Day Events or Recurring Events. The classification will be determined upon creating an new event. Setting recurring to None will make the event a Single Day Event and selecting any other option will make the event a Recurring Event.
- None - does not reoccur, single occurrence
- Daily - set interval (everyday, every other, every third day, etc.) & end date
- Weekly - set interval, what day it should fall on (if applicable), & end date
- Monthly - set interval, what day it should fall on (set date or day of the week), & end date
- Yearly - set interval, month & day it should fall on, & end date
Deleting event
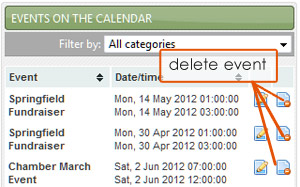
From the Scheduler v3 - Calendar page, locate event you'd like to delete from the events on calendar list on the right hand side. Click on the paper icon with the minus sign to the far right.
Editing Events
Events view
This is the page where you can view/edit all attributes for a specific event.
Date Details & Location
To view the details for each date (as well as edit the location), click the date marker on the calendar.

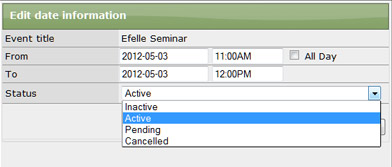
This will trigger the right side to change out and display all the date information. You can then proceed to edit the date information.
Click 'update information' to edit.
- From Date & Time
- To Date & Time
- Status - Active, Inactive, Pending, or Canceled
ADDITIONAL DETAILS
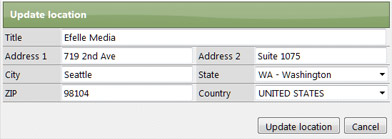
Click the 'update location' button (below the 'date details' section in the upper right) to edit.
- Location Title
- Address Line 1 - # & Street
- Address Line 2 - Apt, Suite, etc.
- City
- State
- Zip
- Country
You'll be prompted to select whether the location should be set for this date only or all future occurrences.
System Data
Click the 'update system data' button (located within the 'additional details' section to the lower right) to edit.
- Max Attendance - optional
Custom Data
Click 'add custom data' to edit. (Optional)
- Field - Description of Value (ex. Instructor)
- Value - Actual Value (ex. Mr. Smith)
Event Basics
Update the basic information for an event. Begin by clicking event basics button in the lower left hand side.
A preview will display in the upper right hand side; click update information.
In the edit event information dialog box that displays, fill in the following details:
- Event title - title of the event that appears for all date records.
- Categories - select multiple categories this event falls under (for filtering purposes). Begin typing to reveal similarly titled categories, if the desired category is not already created, finish typing & click enter.
- Image - image associated with event, displays on front-end in featured events list on the calendar overview, as well as on the events detail page.
- Status - either choose Active or Featured. Featured events will be shown on the front-end Calendar overview.
Click update event information to save changes - or - cancel to keep as is.
Event Details
Event details is a detailed description of the event, which will display on the front-end Event Details page. To edit click event details button in the lower left hand section.
![]()
Click on the update details button below the description preview in the right hand section. An edit event details dialog box will display, enter the event description in the wysiwyg editor.
Registration Form
Each event can have it's own custom registration form. To edit click the registration form button in the lower left hand section.
![]()
Within the event registration form area that displays in the upper right hand side, click update registration form. In the 'edit registration form' dialog box that displays, enter the following:
- form title - title of form
- registrations? - ensure that the drop down field is set to 'yes'
- fields - add addition form fields by clicking 'add field'. Select the field type from the drop down, enter the field name (ie the value you'd like the registrant to enter) and click the 'req.' check box if you'd like it to be required. (First Name, Last Name, & Email are required by default).
When finished click save changes.
Registrants
View who has registered for an event. To view click the registration button in the lower left hand section.
A list will display in the upper right hand side.
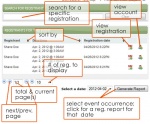
- Search - Use the search to find specific registrations. Or toggle through the pages using the first, last, next, & previous buttons. Select # of registrations to display from the drop down (to the right of current/total pages).
- Sort - Use the arrows to the right of 'registrant', 'date/time', & 'registration date' to sort the column by either ascending or descending order.
- View Registration - Click on the small calendar icon to the right of the registration. You will be redirected to the 'registration - view details' page where the registrant contact information will display as well as options to edit the registration or unregister the individual.
- View Account - Click on the small person icon to the right of the view registration icon.
- Report - Select an event occurrence date from the drop down & click 'generate report'. (Pop-ups must be allowed for this page) A new tab/window will display a registrant list you may print or export.
Contacts
Each event can have it's own set of Contacts. New Contacts can be added (per request; not yet customizable from the Settings interface). To edit click the contacts button in the lower left hand section.
![]()
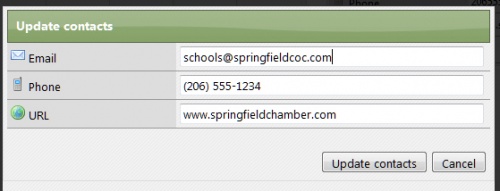
Click on the update contacts within the event contact area in the upper right hand section. An update contacts dialog box will display, enter an email, phone #, and URL, if applicable. Click update contacts to save changes or cancel to keep as is.
Social Media
Each event can have it's own set of Social Media links. To edit click the social media button in the lower left hand section. New Social Media services can be added (per request; not yet customizable from the Settings interface).
![]()
Click on the update social media within the event social media area in the upper right hand section. An update social media dialog box will display, enter a Facebook, google+, LinkedIn, Twitter, Yelp, or YouTube URL, if applicable. Click update social media to save changes or cancel to keep as is.
System Fields
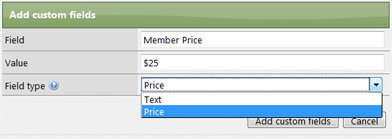
System Fields are special fields configured by efelle media that are optional for each event. Examples of System Fields are registration prices (you may have more than one price) or max attendance caps. To edit click the custom fields button in the lower left hand section.
![]()
- Field - title of custom data (descriptor)
- Value - actual value
- Field Type - text or price
Click update social media to save changes or cancel to keep as is.
Registrations
Creating new registration
Updating existing registration
Deleting Existing Registration
Reporting
Add a report
After selecting Reporting from the Schedulerv3 menu on the left, from the Reports page click add report either below the list of reports on the far right or from within the reporting submenu on the left.

At the edit report page fill in the following within the general settings section:
- Report Name
- Description
- Report Type - Calendar Information (reports based on event information) or Registration Information (reports based on registration information)
The options that display under report contents are based on the report type (ie Calendar Information vs. Registration Information) selected. Check the fields you'd like to display on the report.
To further filter, set parameters within the only show these results section. Select the field the filtering will be based on (options are based on those checked fields within the report contents section), select =, >, <, before, after, or regexp, from the second drop down menu and enter the value in the last field. Click add filter row to apply the filter.
When complete click save report settings within the general settings section to save the report.
Edit a report
From the reports page click on the report you'd like to edit. Follow the add a report steps to edit and save the report.
View a Report
From the reports page click on the report you'd like to edit.
Click view report within the general settings section.

Delete a report
From the reports page click on the report you'd like to delete.
- Check the delete report check box
- Click save report settings
Settings
Maintain categories
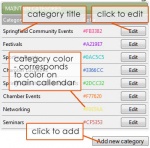
Edit & add event categories. (You can also add categories from the 'add event' & 'edit event basics' dialog boxes)
- category title
- category color - hex color; displays on the main calendar for quick recognition of which primary category an event falls within
Maintain contact types
Disable/enable event contact types (email, phone, or URL). New contact types can be added upon request (this is not yet customizable). To disable/enable, click settings to the right of the contact type you'd like to disable/enable. From the status drop down menu, select the desired option and click update contact type to save changes or cancel to keep as is.
Maintain social Media types
Disable/enable event social media types (facebook, google+, linkedin, twitter, yelp, or youtube). New social media types can be added upon request (this is not yet customizable). To disable/enable, click settings to the right of the social media type you'd like to disable/enable. From the status drop down menu, select the desired option and click update social media type to save changes or cancel to keep as is.
